How CI/CD Pipelines Work in DevOps
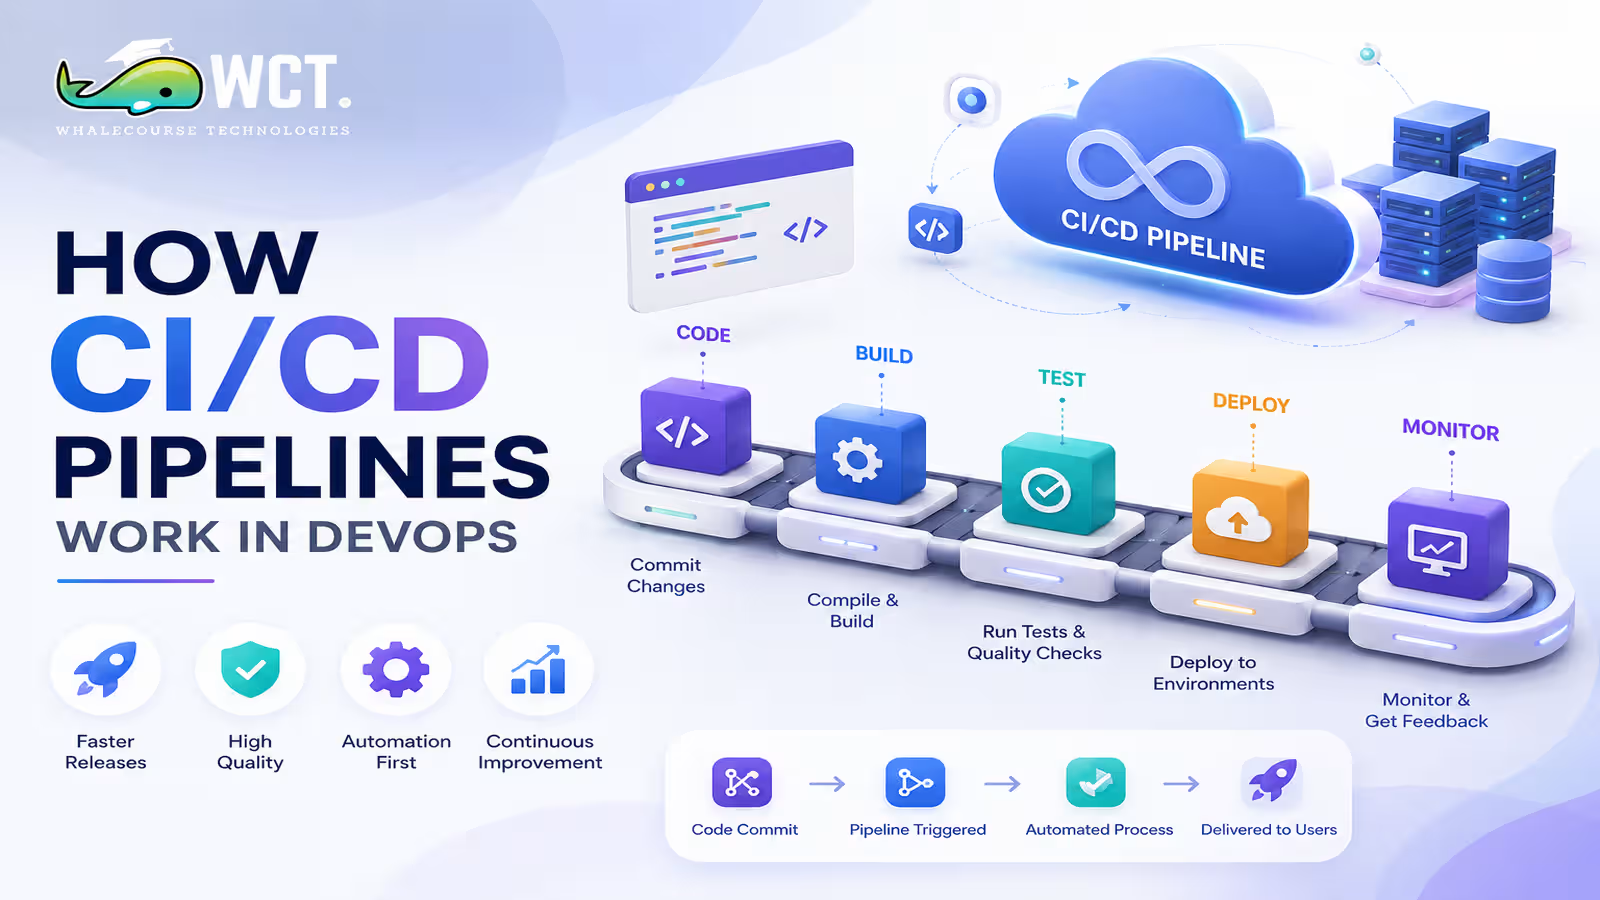
A CI/CD pipeline is the automated mechanism that takes code written by a developer and moves it through build, test, and deployment stages until it is running in production. If you work in software development, cloud engineering, or DevOps, you will encounter CI/CD pipelines constantly. This article explains exactly how they work — not in abstract terms, but in the concrete sequence of events that happens every time a developer pushes a code change. By the end, you will understand every stage of the process and be ready to build one yourself.
What CI/CD Actually Means
CI stands for Continuous Integration. CD stands for either Continuous Delivery or Continuous Deployment, depending on the context. These two letters carry different meanings and it is worth being precise.
Continuous Integration is the practice of merging code changes from multiple developers into a shared repository frequently — ideally multiple times per day — and automatically running a build and test suite every time a merge happens. The goal is to catch integration problems immediately rather than discovering them days or weeks later when many changes have accumulated. Before CI was common, teams would work in isolation for weeks and then spend days in painful merge conflicts and debugging sessions. CI eliminates that pattern.
Continuous Delivery means that after every successful CI build, the software is automatically packaged and made ready to deploy to any environment at any moment. A human still makes the final decision about when to release to production.
Continuous Deployment goes one step further — every change that passes all automated tests is deployed to production automatically without human intervention. Most organizations practice Continuous Delivery rather than full Continuous Deployment, particularly for systems where a bad release would have serious consequences.
A CI/CD pipeline is the automated system that implements both practices. It is a defined sequence of stages that your code passes through on its way from a developer’s machine to production.
The Trigger: How a Pipeline Starts
A CI/CD pipeline does not run on a schedule by default. It is triggered by an event. The most common trigger is a push to a branch in a Git repository — when a developer pushes code to GitHub, GitLab, Azure Repos, or Bitbucket, the version control platform sends a webhook notification to the pipeline service, which starts a new pipeline run.
Common trigger types include: a push to any branch (CI trigger for all changes), a push to specific branches like main or release (common for deployment pipelines), the creation of a pull request (for review builds that check code quality before merging), a scheduled time (nightly builds or compliance scans), and manual triggers where a team member starts the pipeline by clicking a button in the pipeline UI.
Most mature CI/CD setups use at least two types of triggers: a pull request trigger that runs a CI build with tests before any code is merged, and a main-branch trigger that runs the full build, test, and deployment sequence after a merge is approved. This approach ensures that nothing broken ever reaches the shared main branch and that deployments happen automatically after code review is complete.
Stage 1: Source Code Checkout
Once the pipeline is triggered, the first thing that happens is the pipeline agent — the machine that will run the pipeline jobs — checks out the code from the source repository at the exact commit that triggered the run. This ensures the pipeline always builds the specific version of the code that was pushed, not some other version.
The checkout step also establishes the workspace — a temporary directory on the agent machine where all subsequent pipeline steps will read and write files. After the pipeline run completes, this workspace is typically cleaned up, ensuring each run starts from a clean state without leftover files from previous runs that could cause hard-to-reproduce build failures.
Stage 2: Build
The build stage compiles the source code into a deployable artifact. What this looks like depends on the technology stack. For a Java application, the pipeline runs Maven or Gradle to compile the Java source files into a JAR or WAR file. For a JavaScript application, it might run npm install to install dependencies and then a bundler like webpack or Vite to produce optimized static files. For a Python application, the build stage might install dependencies into a virtual environment and package the application. For containerized applications, this stage typically runs docker build to create a Docker image.
The output of the build stage is an artifact — the packaged, deployable form of the application. This artifact is stored in a location accessible to subsequent pipeline stages, such as a pipeline artifact storage service, a container registry, or a package repository like npm or PyPI. The key principle is that the artifact is built once and promoted through environments, never rebuilt from source for each environment. This ensures the exact same binary that was tested in staging is what gets deployed to production.
Stage 3: Automated Testing
Automated testing is the stage that makes CI/CD genuinely valuable. Without it, a pipeline is just automated deployment — fast but potentially dangerous. With comprehensive automated tests, the pipeline becomes a safety net that catches regressions before they reach users.
CI/CD pipelines typically run multiple test categories in a deliberate order, from fastest to slowest, stopping at the first failure to provide rapid feedback.
- Unit tests — Test individual functions or classes in isolation. They run in milliseconds and should be the most numerous tests in any codebase. A failing unit test tells you exactly which function is broken.
- Integration tests — Test how components interact with each other and with dependencies like databases and external APIs. These take longer but catch problems that unit tests cannot, such as incorrect database queries or mismatched API contracts.
- Static code analysis and linting — Tools such as ESLint, SonarQube, and Pylint review your source code for style consistency, identify potential issues, and evaluate code complexity without actually executing the application. These checks often run in parallel with unit tests to save time.
- Security scanning — Tools like Snyk, Trivy, or Dependabot check your dependencies for known vulnerabilities and flag insecure coding patterns. Many compliance-focused organizations require these scans to pass before any deployment can proceed.
If all tests pass, the pipeline moves forward. If any test fails, the pipeline stops immediately, marks the run as failed, and notifies the developer who triggered the change. This instant feedback loop is the core value proposition of Continuous Integration.
Stage 4: Deployment to Development and Staging Environments
After the build and test stages pass, the pipeline deploys the artifact to the first environment — usually called development or dev. This environment runs the same application as production but with test data and often with less redundancy and lower performance capacity. It is where the development team can see their changes running on real infrastructure and run any additional manual checks they want to do before promotion.
From development, the pipeline promotes the artifact to a staging environment. Staging is designed to be as close to production as possible — same infrastructure configuration, same data volume (often using anonymized production data snapshots), same integrations. The goal is to surface any environment-specific issues before they reach real users. Many teams run their end-to-end automated test suite in staging as well, since these tests run against a fully deployed application and take longer than unit or integration tests.
Environment-specific configuration values — database connection strings, API keys, feature flags — are injected at deployment time from secure secret stores like HashiCorp Vault, Azure Key Vault, or AWS Secrets Manager. The artifact itself never contains environment-specific configuration. This separation is what allows the same artifact to work correctly in development, staging, and production without modification.
Stage 5: Production Deployment and Release Strategies
Production deployment is the final stage of the CD pipeline. How it happens depends on the release strategy the team has chosen. Understanding the main strategies helps you design pipelines that minimize risk and downtime.
Rolling deployment — Replace instances of the old version with the new version gradually, a few at a time, until all instances are running the new version. If problems appear during the rollout, you stop and roll back the remaining instances. Simple to implement and works well for most applications.
Blue-green deployment — Run two identical production environments, one active (blue) and one idle (green). Deploy the new version to the idle green environment, run smoke tests to verify it works correctly, then switch all traffic from blue to green in a single routing change. Rolling back is instant — just switch traffic back to blue. More expensive because it requires maintaining two full production environments simultaneously.
Canary deployment — Route a small share of live production traffic (usually between one and ten percent) to the new release while the rest of the users continue using the existing version. Monitor error rates, latency, and business metrics for the canary users. If everything looks good, gradually increase the traffic percentage to the new version over time. This is the most sophisticated strategy and gives you the earliest possible signal of production problems with minimal user impact.
Most CI/CD platforms support all three strategies, though canary deployments typically require a traffic management layer like a load balancer, API gateway, or service mesh to implement cleanly.
Common CI/CD Tools in 2026
The CI/CD tool landscape is mature and competitive. These are the most widely used options and their primary use cases.
- GitHub Actions — Seamlessly works with GitHub repositories. Uses YAML workflow files that are saved within the repository. Excellent free tier for public repos and generous for private repos. The fastest-growing CI/CD platform in terms of adoption.
- GitLab CI/CD — Built into GitLab’s DevOps platform. YAML-based pipelines with powerful features like parent-child pipeline relationships and DAG (directed acyclic graph) execution for complex dependency management between jobs.
- Azure Pipelines — Part of Azure DevOps. Supports both YAML and classic GUI-based pipeline configuration. Seamlessly integrates with Microsoft Azure cloud services. Widely used in enterprise Microsoft environments.
- Jenkins — The most established CI/CD tool with the largest plugin ecosystem. Self-hosted only. Highly flexible but requires significant maintenance effort. Still widely deployed in large enterprises that adopted it early and have invested in extensive customization.
- CircleCI — Cloud-hosted CI/CD with strong parallelization features and a developer-friendly configuration format. Popular in startups and product companies.
What a CI/CD Pipeline YAML File Actually Looks Like
Most modern CI/CD pipelines are defined as YAML files stored in the root of the repository alongside the application code. This approach, called pipeline-as-code, means your pipeline definition is version-controlled, peer-reviewed, and changes to it go through the same pull request process as any other code change.
A basic GitHub Actions workflow file for a Node.js application might define a trigger on pushes to main, a job that runs on Ubuntu, checkout step to clone the repository, an npm install step to install dependencies, an npm test step to run the test suite, and a deployment step that deploys to an Azure App Service using a service connection secret stored in GitHub Secrets. The entire file is typically between twenty and fifty lines for a simple application. More complex pipelines with multiple environments, parallel test execution, and conditional deployment steps can grow to several hundred lines, but the structure remains readable and self-documenting when written clearly.
Understanding how to read and write pipeline YAML is a foundational DevOps skill. If you are learning CI/CD, spend time writing your own pipeline files from scratch rather than copying templates. The process of debugging why a step fails teaches you more about how pipelines work than any tutorial.
Common CI/CD Problems and How to Fix Them
Even well-designed CI/CD pipelines encounter recurring problems. Knowing how to recognize and fix them is a core DevOps skill.
- Flaky tests — Tests that pass sometimes and fail other times without code changes. Usually caused by timing issues, external service dependencies, or shared mutable state between tests. Resolve the issue by implementing retry mechanisms, replacing external services with mocks during testing, and keeping every test independent to avoid interference. Flaky tests erode trust in the pipeline and cause teams to ignore failures.
- Slow pipelines — Pipelines that take more than fifteen to twenty minutes to complete discourage developers from pushing frequently. Fix by parallelizing independent jobs, caching dependency installations between runs, and splitting long test suites across multiple parallel agents.
- Secrets management failures — Hardcoded credentials in pipeline files or environment variable misconfigurations. Fix by using the secret management features of your CI/CD platform — GitHub Secrets, Azure Key Vault, or GitLab CI/CD variables — and auditing pipeline logs to confirm secrets are never printed.
- Environment drift — Over time, development, staging, and production environments become inconsistent, causing tests to succeed in staging but fail after deployment to production. Fix by managing all environments with Infrastructure as Code and using containers to ensure consistent runtime environments.
How to Build Your First CI/CD Pipeline
If you want to build your first CI/CD pipeline, here is a practical approach that takes you from zero to a working pipeline in a day.
- Set up a GitHub account and create a new repository. Push a simple web application — even a static HTML page — to the repository.
- Create a .github/workflows directory in your repository and add a workflow YAML file. Start with a trigger on push to main and a single job with two steps: checkout the code and print a confirmation message. Run it and watch the Actions tab to see the job execute.
- Add a testing step. If your application has tests, run them. If not, add a simple linting check or a file existence check. This establishes the habit of failing the pipeline when something is wrong.
- Add a deployment step. Create a free Azure account or use GitHub Pages for static sites. Configure the service connection or deployment token as a repository secret. Add the deployment step to your workflow and trigger it by pushing a change.
- Verify the deployment by opening the live URL and confirming your change is visible.
Once this basic pipeline works end to end, you have the foundation to add complexity incrementally — multiple environments, approval gates, parallel test execution, and more sophisticated deployment strategies. Every enhancement you add to a working pipeline teaches you far more than any course that starts from a finished example.
Start Your Data Analytics Career Today
Join WhaleCourseTechnologies for affordable training with hands-on projects and placement support.
Conclusion
A CI/CD pipeline is not something you configure once and leave unchanged. It is a living part of your software delivery system that grows more valuable as you invest in the quality of your test suite, the reliability of your deployment automation, and the speed of your feedback loops. The teams that get the most from CI/CD are those that treat the pipeline itself as a product — continuously improving it, measuring it, and fixing it when it becomes a friction point rather than an enabler.
If you are starting from scratch, build something small but complete. A complete pipeline that moves code into a deployed application, even in its simplest form, helps you build the core skills needed for more advanced CI/CD workflows. From there, every problem you encounter and solve in your pipeline turns into experience that makes you significantly more effective as a DevOps engineer, cloud engineer, or software developer in any modern engineering organization.
In This Article
Enroll in Our IT Courses
Master IT Program at whalecoursetechnologies
- Expert Mentorship from IT Professionals
- Job-Ready Skills with Live Projects
- Career Boost Add-on Modules
- 100% Placement & Interview Support
